Sunday, March 11, 2012

Rainbow Spaghetti: scrapping the stock wiring and installing an 8 circuit race car kit

The lack of headlights, turn signals, and anything that wasn't the starter or ignition system left me with a choice: spend countless hours trying to decipher the hieroglyphics that are the the shop manual of a 1979 Porsche and eliminate all unnecessary wires, or spend $1500 and buy a stand alone race car wiring kit with new gauges.

After seeing this clusterf*ck that is the stock wiring, guess which option I picked...


They say a picture is worth 1000 words, this one is worth 1000 profanities


Using the time traveling power of Evan Williams, the 20lbs of old, crunchy, stock wiring was dispensed with quickly


After sacrificing 2 paychecks to the car gods, I was rewarded with a big brown box of dials, switches, and many wires (also some brake duct hardware but we'll get to that later)


$800 of the $1500 was spent on this Painless Wiring 8 circuit race car kit. Worth every penny.


Switch panel


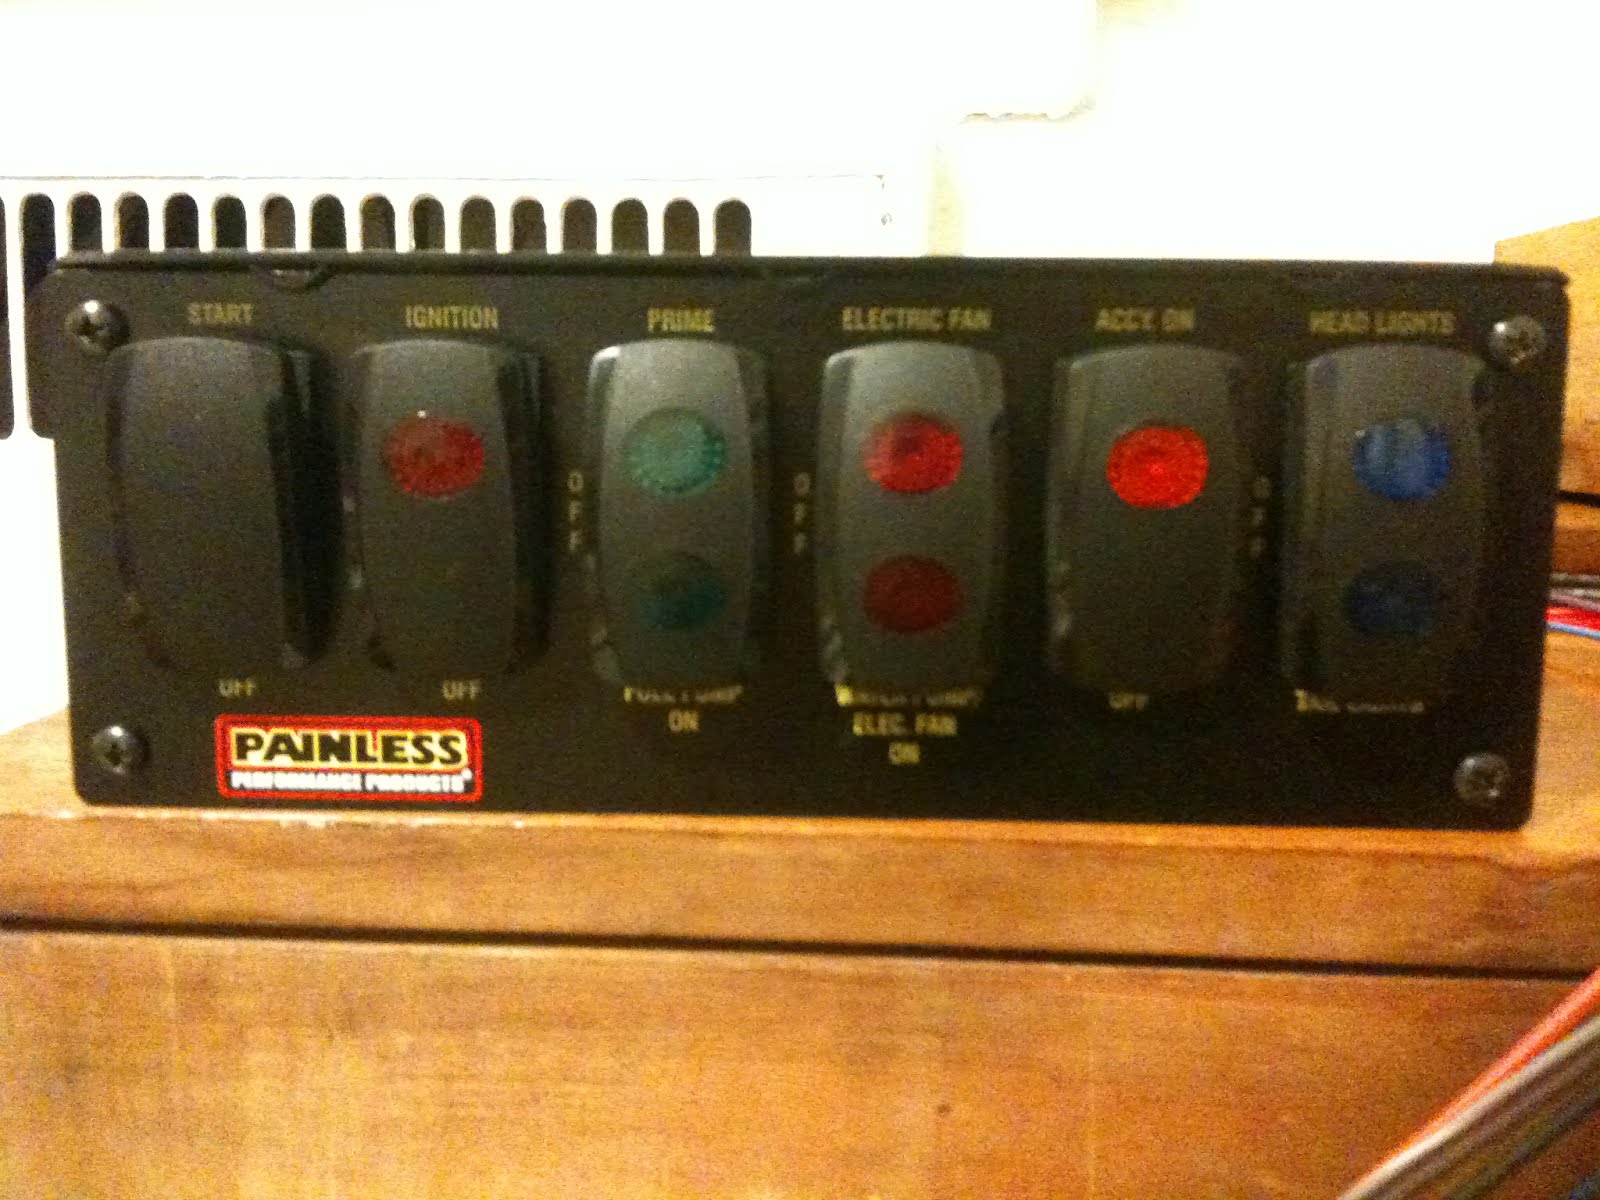
Mounting all the electrics on one panel makes install and removal simple and fast


New gauge panel made from 3/8" lexan left over from the windshield


Making sure everything fits


A few coats of paint and it's finished.

Gauges are: Oil pressure, Coolant temp, Volts, Fuel, Tach, Speedo, and Fuel pressure (not pictured)


Installed:


Engine bay is much less cluttered with no EFI wires


Start up procedure:


Parting words:

This whole process was time consuming but extremely simple with the included instruction manual from Painless Wiring. If you plan on installing on of their kits, don't be afraid to call and ask for help, they are all super nice and will spend as much time as needed to help you solve whatever conundrum has you stuck. Their tech support line is open on weekends as well!

Tuesday, March 6, 2012

Adding lightness and downforce: Making a splitter and ditching the headlights

Since this car will probably never be raced at night there was no reason to keep the stock headlights.


~30lb weight loss= headlights, foglights, turn signals, rotation motor, and wiring


Lots of room for brake ducts


Lexan headlight cover


Paint only the back side of the lexan so if the front gets scratched there won't be paint chips


Done: 30lbs lighter and better aero


DIY: Plywood splitter+air dam

Step 1: Get a 4x8 sheet of 3/8" plywood along with the bits seen below in home depot's racing department


Step 2: Cut sheet into 2 pieces so there will be enough wood for a spare splitter.

Step 3: Make template and cut wood accordingly... garbage cans are an acceptable form of sawhorse

Step 4: determine mounting points and drill holes


Step 5: measure distance between splitter and bottom of bumper, cut strips of plywood for air dam.


Mount with 90* steel gate brackets... also from home depot
Then sand and put on a protective waterproof varnish so the wood doesn't rot


Rivet everything in place, screws/bolts are no good as they can blow out your tires if the splitter gets shredded or ripped off


Use an RTV or equivalent sealant around explodes areas to help waterproofing and air flow


Admire snazzy new homemade splitter/ air dam.
Then realize it cost less than $50, and you have a spare in case this one goes tits up when you inevitably crash


Lexan rear window, DIY front crossmember, and the pinaccle of go-faster bits: the spoiler

Lexan is fantastic. Its unbreakable for a kickoff, but its also extremely light and cheaper than dirt... Seriously, its actually cheaper to buy a sheet of lexan than some potting soil, also they are both sold at home depot.

Step 1: Take heavy glass out of insanely tacky german window goop


Step 2: Make template of original window from cardboard so german window goop doesnt get all over the new lexan


Step 3: Trace then cut


Test fit


Step 4: make some supports from angle aluminum or something similar


The steel used for the hatch was too flimsy for my taste, so some 1/4" steel plate left over from the roll cage was used to make a mounting plate for the wing


Step 5: test fit again, then prepare to drill more consecutive holes than you ever have before....and yes, thats what she said


Step 6: Lay down some RTV or black weatherproof sealant before permanently attaching the lexan, it will help keep the lexan in place as well as keep water out of your hatch.


Step 7: Rivet until your wrist is completely destroyed


Drill holes in mounting plate and mount spoiler using heavy duty home depot supports for the back part of the uprights.


I ended up putting a small lip where the gap between the end of the lexan and back of the hatch with some thick tab aluminum and added a small lip which (in theory) should help to produce more down force.


Sidebar: DIY crossmember... If you have more than 500hp in any car, its a good idea to reinforce the front of the car, even with a chassis as Viagra stiff as the 928's

Materials= square steel tube, tab steel

Step 1: Drill 2 holes in tab steel


Step 2: bolt on to lower control arm then place square steel tube on top


Step 3: Weld it up then add paint: